

小
蓝
科
创


python为什么性能差: 当我们提到一门编程语言的效率时:通常有两层意思,第一是开发效率,这是对程序员而言,完成编码所需要的时间;另一个是运行效率,这是对计算机而言,完成计算任务所需要的时间。编码效率和运行效率往往是鱼与熊掌的关系,是很难同时兼顾的。不同的语言会有不同的侧重,python语言毫无疑问更在乎编码效率,life is short,we use python。 虽然使用python的编程人员都应该接受其运行效率低的事实,但python在越多越来的领域都有广泛应用,比如科学计算 、web服务器等。程序员当然也希望python能够运算得更快,希望python可以更强大。 首先,python相比其他语言具体有多慢,这个不同场景和测试用例,结果肯定是不一样的。这个网址给出了不同语言在各种case下的性能对比,这一页是python3和C++的对比,下面是两个case: 从上图可以看出,不同的case,python比C++慢了几倍到几十倍。 python运算效率低,具体是什么原因呢,下列罗列一些 第一:python是动态语言 一个变量所指向对象的类型在运行时才确定,编译器做不了任何预测,也就无从优化。举一个简单的例子: r = a + b。 a和b相加,但a和b的类型在运行时才知道,对于加法操作,不同的类型有不同的处理,所以每次运行的时候都会去判断a和b的类型,然后执行对应的操作。而在静态语言如C++中,编译的时候就确定了运行时的代码。 另外一个例子是属性查找,关于具体的查找顺序在《python属性查找》中有详细介绍。简而言之,访问对象的某个属性是一个非常复杂的过程,而且通过同一个变量访问到的python对象还都可能不一样(参见Lazy property的例子)。而在C语言中,访问属性用对象的地址加上属性的偏移就可以了。 第二:python是解释执行,但是不支持JIT(just in time compiler)。虽然大名鼎鼎的google曾经尝试Unladen Swallow 这个项目,但最终也折了。 第三:python中一切都是对象,每个对象都需要维护引用计数,增加了额外的工作。 第四:python GIL GIL是Python最为诟病的一点,因为GIL,python中的多线程并不能真正的并发。如果是在IO bound的业务场景,这个问题并不大,但是在CPU BOUND的场景,这就很致命了。所以笔者在工作中使用python多线程的情况并不多,一般都是使用多进程(pre fork),或者在加上协程。即使在单线程,GIL也会带来很大的性能影响,因为python每执行100个opcode(默认,可以通过sys.setcheckinterval()设置)就会尝试线程的切换,具体的源代码在ceval.c::PyEval_EvalFrameEx。 第五:垃圾回收,这个可能是所有具有垃圾回收的编程语言的通病。python采用标记和分代的垃圾回收策略,每次垃圾回收的时候都会中断正在执行的程序(stop the world),造成所谓的顿卡。infoq上有一篇文章,提到禁用Python的GC机制后,Instagram性能提升了10%。感兴趣的读者可以去细读。 Be pythonic 我们都知道 过早的优化是罪恶之源,一切优化都需要基于profile。但是,作为一个python开发者应该要pythonic,而且pythonic的代码往往比non-pythonic的代码效率高一些,比如: 使用迭代器iterator,for example: dict的iteritems 而不是items(同itervalues,iterkeys) 使用generator,特别是在循环中可能提前break的情况 判断是否是同一个对象使用 is 而不是 == 判断一个对象是否在一个集合中,使用set而不是list 利用短路求值特性,把“短路”概率过的逻辑表达式写在前面。其他的lazy ideas也是可以的 对于大量字符串的累加,使用join操作 使用for else(while else)语法 交换两个变量的值使用: a, b = b, a 基于profile的优化 即使我们的代码已经非常pythonic了,但可能运行效率还是不能满足预期。我们也知道80/20定律,绝大多数的时间都耗费在少量的代码片段里面了,优化的关键在于找出这些瓶颈代码。方式很多:到处加log打印时间戳、或者将怀疑的函数使用timeit进行单独测试,但最有效的是使用profile工具。 python profilers 对于python程序,比较出名的profile工具有三个:profile、cprofile和hotshot。其中profile是纯python语言实现的,Cprofile将profile的部分实现native化,hotshot也是C语言实现,hotshot与Cprofile的区别在于:hotshot对目标代码的运行影响较小,代价是更多的后处理时间,而且hotshot已经停止维护了。需要注意的是,profile(Cprofile hotshot)只适合单线程的python程序。 对于多线程,可以使用yappi,yappi不仅支持多线程,还可以精确到CPU时间 对于协程(greenlet),可以使用greenletprofiler,基于yappi修改,用greenlet context hook住thread context 下面给出一段编造的”效率低下“的代码,并使用Cprofile来说明profile的具体方法以及我们可能遇到的性能瓶颈。 1 # -*- coding: UTF-8 -*- 2 3 from cProfile import Profile 4 import math 5 def foo(): 6 return foo1() 7 8 def foo1(): 9 return foo2() 10 11 def foo2(): 12 return foo3() 13 14 def foo3(): 15 return foo4() 16 17 def foo4(): 18 return "this call tree seems ugly, but it always happen" 19 20 def bar(): 21 ret = 0 22 for i in xrange(10000): 23 ret += i * i + math.sqrt(i) 24 return ret 25 26 def main(): 27 for i in range(100000): 28 if i % 10000 == 0: 29 bar() 30 else: 31 foo() 32 33 if __name__ == '__main__': 34 prof = Profile() 35 prof.runcall(main) 36 prof.print_stats() 37 #prof.dump_stats('test.prof') # dump profile result to test.prof 运行结果如下: 对于上面的的输出,每一个字段意义如下: ncalls 函数总的调用次数 tottime 函数内部(不包括子函数)的占用时间 percall(第一个) tottime/ncalls cumtime 函数包括子函数所占用的时间 percall(第二个)cumtime/ncalls filename:lineno(function) 文件:行号(函数) 代码中的输出非常简单,事实上可以利用pstat,让profile结果的输出多样化,具体可以参见官方文档python profiler。 profile GUI tools 虽然Cprofile的输出已经比较直观,但我们还是倾向于保存profile的结果,然后用图形化的工具来从不同的维度来分析,或者比较优化前后的代码。查看profile结果的工具也比较多,比如,visualpytune、qcachegrind、runsnakerun,本文用visualpytune做分析。对于上面的代码,按照注释生成修改后重新运行生成test.prof文件,用visualpytune直接打开就可以了,如下: 字段的意义与文本输出基本一致,不过便捷性可以点击字段名排序。左下方列出了当前函数的calller(调用者),右下方是当前函数内部与子函数的时间占用情况。上如是按照cumtime(即该函数内部及其子函数所占的时间和)排序的结果。 造成性能瓶颈的原因通常是高频调用的函数、单次消耗非常高的函数、或者二者的结合。在我们前面的例子中,foo就属于高频调用的情况,bar属于单次消耗非常高的情况,这都是我们需要优化的重点。 python-profiling-tools中介绍了qcachegrind和runsnakerun的使用方法,这两个colorful的工具比visualpytune强大得多。具体的使用方法请参考原文,下图给出test.prof用qcachegrind打开的结果 qcachegrind确实要比visualpytune强大。从上图可以看到,大致分为三部:。第一部分同visualpytune类似,是每个函数占用的时间,其中Incl等同于cumtime, Self等同于tottime。第二部分和第三部分都有很多标签,不同的标签标示从不同的角度来看结果,如图上所以,第三部分的“call graph”展示了该函数的call tree并包含每个子函数的时间百分比,一目了然。 profile针对优化 知道了热点,就可以进行针对性的优化,而这个优化往往根具体的业务密切相关,没用万能钥匙,具体问题,具体分析。个人经验而言,最有效的优化是找产品经理讨论需求,可能换一种方式也能满足需求,少者稍微折衷一下产品经理也能接受。次之是修改代码的实现,比如之前使用了一个比较通俗易懂但效率较低的算法,如果这个算法成为了性能瓶颈,那就考虑换一种效率更高但是可能难理解的算法、或者使用dirty Flag模式。对于这些同样的方法,需要结合具体的案例,本文不做赘述。 接下来结合python语言特性,介绍一些让python代码不那么pythonic,但可以提升性能的一些做法 第一:减少函数的调用层次 每一层函数调用都会带来不小的开销,特别对于调用频率高,但单次消耗较小的calltree,多层的函数调用开销就很大,这个时候可以考虑将其展开。 对于之前调到的profile的代码,foo这个call tree非常简单,但频率高。修改代码,增加一个plain_foo()函数, 直接返回最终结果,关键输出如下: 跟之前的结果对比: 可以看到,优化了差不多3倍。 第二:优化属性查找 上面提到,python 的属性查找效率很低,如果在一段代码中频繁访问一个属性(比如for循环),那么可以考虑用局部变量代替对象的属性。 第三:关闭GC 在本文的第一章节已经提到,关闭GC可以提升python的性能,GC带来的顿卡在实时性要求比较高的应用场景也是难以接受的。但关闭GC并不是一件容易的事情。我们知道python的引用计数只能应付没有循环引用的情况,有了循环引用就需要靠GC来处理。在python语言中, 写出循环引用非常容易。比如: case 1: a, b = SomeClass(), SomeClass() a.b, b.a = b, a case 2: lst = [] lst.append(lst) case 3: self.handler = self.some_func 当然,大家可能说,谁会这么傻,写出这样的代码,是的,上面的代码太明显,当中间多几个层级之后,就会出现“间接”的循环应用。在python的标准库 collections里面的OrderedDict就是case2: 要解决循环引用,第一个办法是使用弱引用(weakref),第二个是手动解循环引用。 第四:setcheckinterval 如果程序确定是单线程,那么修改checkinterval为一个更大的值,这里有介绍。 第五:使用__slots__ slots最主要的目的是用来节省内存,但是也能一定程度上提高性能。我们知道定义了__slots__的类,对某一个实例都会预留足够的空间,也就不会再自动创建__dict__。当然,使用__slots__也有许多注意事项,最重要的一点,继承链上的所有类都必须定义__slots__,python doc有详细的描述。下面看一个简单的测试例子: 1 class BaseSlots(object): 2 __slots__ = ['e', 'f', 'g'] 3 4 class Slots(BaseSlots): 5 __slots__ = ['a', 'b', 'c', 'd'] 6 def __init__(self): 7 self.a = self.b = self.c = self.d = self.e = self.f = self.g = 0 8 9 class BaseNoSlots(object): 10 pass 11 12 class NoSlots(BaseNoSlots): 13 def __init__(self): 14 super(NoSlots,self).__init__() 15 self.a = self.b = self.c = self.d = self.e = self.f = self.g = 0 16 17 def log_time(s): 18 begin = time.time() 19 for i in xrange(10000000): 20 s.a,s.b,s.c,s.d, s.e, s.f, s.g 21 return time.time() - begin 22 23 if __name__ == '__main__': 24 print 'Slots cost', log_time(Slots()) 25 print 'NoSlots cost', log_time(NoSlots()) 输出结果: Slots cost 3.12999987602NoSlots cost 3.48100018501 python C扩展 也许通过profile,我们已经找到了性能热点,但这个热点就是要运行大量的计算,而且没法cache,没法省略。。。这个时候就该python的C扩展出马了,C扩展就是把部分python代码用C或者C++重新实现,然后编译成动态链接库,提供接口给其它python代码调用。由于C语言的效率远远高于python代码,所以使用C扩展是非常普遍的做法,比如我们前面提到的cProfile就是基于_lsprof.so的一层封装。python的大所属对性能有要求的库都使用或者提供了C扩展,如gevent、protobuff、bson。 笔者曾经测试过纯python版本的bson和cbson的效率,在综合的情况下,cbson快了差不多10倍! python的C扩展也是一个非常复杂的问题,本文仅给出一些注意事项: 第一:注意引用计数的正确管理 这是最难最复杂的一点。我们都知道python基于指针技术来管理对象的生命周期,如果在扩展中引用计数出了问题,那么要么是程序崩溃,要么是内存泄漏。更要命的是,引用计数导致的问题很难debug。。。 C扩展中关于引用计数最关键的三个词是:steal reference,borrowed reference,new reference。建议编写扩展代码之前细读python的官方文档。 第二:C扩展与多线程 这里的多线程是指在扩展中new出来的C语言线程,而不是python的多线程,出了python doc里面的介绍,也可以看看《python cookbook》的相关章节。 第三:C扩展应用场景 仅适合与业务代码的关系不那么紧密的逻辑,如果一段代码大量业务相关的对象 属性的话,是很难C扩展的 将C扩展封装成python代码可调用的接口的过程称之为binding,Cpython本身就提供了一套原生的API,虽然使用最为广泛,但该规范比较复杂。很多第三方库做了不同程度的封装,以便开发者使用,比如boost.python、cython、ctypes、cffi(同时支持pypy cpython),具体怎么使用可以google。 beyond CPython 尽管python的性能差强人意,但是其易学易用的特性还是赢得越来越多的使用者,业界大牛也从来没有放弃对python的优化。这里的优化是对python语言设计上、或者实现上的一些反思或者增强。这些优化项目一些已经夭折,一些还在进一步改善中,在这个章节介绍目前还不错的一些项目。 cython 前面提到cython可以用到binding c扩展,但是其作用远远不止这一点。 Cython的主要目的是加速python的运行效率,但是又不像上一章节提到的C扩展那么复杂。在Cython中,写C扩展和写python代码的复杂度差不多(多亏了Pyrex)。Cython是python语言的超集,增加了对C语言函数调用和类型声明的支持。从这个角度来看,cython将动态的python代码转换成静态编译的C代码,这也是cython高效的原因。使用cython同C扩展一样,需要编译成动态链接库,在linux环境下既可以用命令行,也可以用distutils。 如果想要系统学习cython,建议从cython document入手,文档写得很好。下面通过一个简单的示例来展示cython的使用方法和性能(linux环境)。 首先,安装cython: pip install Cython 下面是测试用的python代码,可以看到这两个case都是运算复杂度比较高的例子: # -*- coding: UTF-8 -*- def f(x): return x**2-x def integrate_f(a, b, N): s = 0 dx = (b-a)/N for i in range(N): s += f(a+i*dx) return s * dx def main(): import time begin = time.time() for i in xrange(10000): for i in xrange(100):f(10) print 'call f cost:', time.time() - begin begin = time.time() for i in xrange(10000): integrate_f(1.0, 100.0, 1000) print 'call integrate_f cost:', time.time() - begin if __name__ == '__main__': main() 运行结果: call f cost: 0.215116024017 call integrate_f cost: 4.33698010445 不改动任何python代码也可以享受到cython带来的性能提升,具体做法如下: step1:将文件名(cython_example.py)改为cython_example.pyx step2:增加一个setup.py文件,添加一下代码: 1 from distutils.core import setup 2 from Cython.Build import cythonize 3 4 setup( 5 name = 'cython_example', 6 ext_modules = cythonize("cython_example.pyx"), 7 ) step3:执行python setup.py build_ext --inplace 可以看到 增加了两个文件,对应中间结果和最后的动态链接库 step4:执行命令 python -c "import cython_example;cython_example.main()"(注意: 保证当前环境下已经没有 cython_example.py) 运行结果: call f cost: 0.0874309539795 call integrate_f cost: 2.92381191254 性能提升了大概两倍,我们再来试试cython提供的静态类型(static typing),修改cython_example.pyx的核心代码,替换f()和integrate_f()的实现如下: 1 def f(double x): # 参数静态类型 2 return x**2-x 3 4 def integrate_f(double a, double b, int N): 5 cdef int i 6 cdef double s, dx 7 s = 0 8 dx = (b-a)/N 9 for i in range(N): 10 s += f(a+i*dx) 11 return s * dx 然后重新运行上面的第三 四步:结果如下 call f cost: 0.042387008667 call integrate_f cost: 0.958620071411 上面的代码,只是对参数引入了静态类型判断,下面对返回值也引入静态类型判断。 替换f()和integrate_f()的实现如下: 1 cdef double f(double x): # 返回值也有类型判断 2 return x**2-x 3 4 cdef double integrate_f(double a, double b, int N): 5 cdef int i 6 cdef double s, dx 7 s = 0 8 dx = (b-a)/N 9 for i in range(N): 10 s += f(a+i*dx) 11 return s * dx 然后重新运行上面的第三 四步:结果如下 call f cost: 1.19209289551e-06 call integrate_f cost: 0.187038183212 Amazing! pypy pypy是CPython的一个替代实现,其最主要的优势就是pypy的速度,下面是官网的测试结果: 在实际项目中测试,pypy大概比cpython要快3到5倍!pypy的性能提升来自JIT Compiler。在前文提到google的Unladen Swallow 项目也是想在CPython中引入JIT,在这个项目失败后,很多开发人员都开始加入pypy的开发和优化。另外pypy占用的内存更少,而且支持stackless,基本等同于协程。 pypy的缺点在于对C扩展方面支持的不太好,需要使用CFFi来做binding。对于使用广泛的library来说,一般都会支持pypy,但是小众的、或者自行开发的C扩展就需要重新封装了。
查看详情
1. 字符编码简介 1.1. ASCII ASCII(American Standard Code for Information Interchange),是一种单字节的编码。计算机世界里一开始只有英文,而单字节可以表示256个不同的字符,可以表示所有的英文字符和许多的控制符号。不过ASCII只用到了其中的一半(\x80以下),这也是MBCS得以实现的基础。 1.2. MBCS 然而计算机世界里很快就有了其他语言,单字节的ASCII已无法满足需求。后来每个语言就制定了一套自己的编码,由于单字节能表示的字符太少,而且同时也需要与ASCII编码保持兼容,所以这些编码纷纷使用了多字节来表示字符,如GBxxx、BIGxxx等等,他们的规则是,如果第一个字节是\x80以下,则仍然表示ASCII字符;而如果是\x80以上,则跟下一个字节一起(共两个字节)表示一个字符,然后跳过下一个字节,继续往下判断。 这里,IBM发明了一个叫Code Page的概念,将这些编码都收入囊中并分配页码,GBK是第936页,也就是CP936。所以,也可以使用CP936表示GBK。 MBCS(Multi-Byte Character Set)是这些编码的统称。目前为止大家都是用了双字节,所以有时候也叫做DBCS(Double-Byte Character Set)。必须明确的是,MBCS并不是某一种特定的编码,Windows里根据你设定的区域不同,MBCS指代不同的编码,而Linux里无法使用MBCS作为编码。在Windows中你看不到MBCS这几个字符,因为微软为了更加洋气,使用了ANSI来吓唬人,记事本的另存为对话框里编码ANSI就是MBCS。同时,在简体中文Windows默认的区域设定里,指代GBK。 1.3. Unicode 后来,有人开始觉得太多编码导致世界变得过于复杂了,让人脑袋疼,于是大家坐在一起拍脑袋想出来一个方法:所有语言的字符都用同一种字符集来表示,这就是Unicode。 最初的Unicode标准UCS-2使用两个字节表示一个字符,所以你常常可以听到Unicode使用两个字节表示一个字符的说法。但过了不久有人觉得256*256太少了,还是不够用,于是出现了UCS-4标准,它使用4个字节表示一个字符,不过我们用的最多的仍然是UCS-2。 UCS(Unicode Character Set)还仅仅是字符对应码位的一张表而已,比如"汉"这个字的码位是6C49。字符具体如何传输和储存则是由UTF(UCS Transformation Format)来负责。 一开始这事很简单,直接使用UCS的码位来保存,这就是UTF-16,比如,"汉"直接使用\x6C\x49保存(UTF-16-BE),或是倒过来使用\x49\x6C保存(UTF-16-LE)。但用着用着美国人觉得自己吃了大亏,以前英文字母只需要一个字节就能保存了,现在大锅饭一吃变成了两个字节,空间消耗大了一倍……于是UTF-8横空出世。 UTF-8是一种很别扭的编码,具体表现在他是变长的,并且兼容ASCII,ASCII字符使用1字节表示。然而这里省了的必定是从别的地方抠出来的,你肯定也听说过UTF-8里中文字符使用3个字节来保存吧?4个字节保存的字符更是在泪奔……(具体UCS-2是怎么变成UTF-8的请自行搜索) 另外值得一提的是BOM(Byte Order Mark)。我们在储存文件时,文件使用的编码并没有保存,打开时则需要我们记住原先保存时使用的编码并使用这个编码打开,这样一来就产生了许多麻烦。(你可能想说记事本打开文件时并没有让选编码?不妨先打开记事本再使用文件 -> 打开看看)而UTF则引入了BOM来表示自身编码,如果一开始读入的几个字节是其中之一,则代表接下来要读取的文字使用的编码是相应的编码: BOM_UTF8 '\xef\xbb\xbf' BOM_UTF16_LE '\xff\xfe' BOM_UTF16_BE '\xfe\xff' 并不是所有的编辑器都会写入BOM,但即使没有BOM,Unicode还是可以读取的,只是像MBCS的编码一样,需要另行指定具体的编码,否则解码将会失败。 你可能听说过UTF-8不需要BOM,这种说法是不对的,只是绝大多数编辑器在没有BOM时都是以UTF-8作为默认编码读取。即使是保存时默认使用ANSI(MBCS)的记事本,在读取文件时也是先使用UTF-8测试编码,如果可以成功解码,则使用UTF-8解码。记事本这个别扭的做法造成了一个BUG:如果你新建文本文件并输入"姹塧"然后使用ANSI(MBCS)保存,再打开就会变成"汉a",你不妨试试 :) 2. Python2.x中的编码问题 2.1. str和unicode str和unicode都是basestring的子类。严格意义上说,str其实是字节串,它是unicode经过编码后的字节组成的序列。对UTF-8编码的str'汉'使用len()函数时,结果是3,因为实际上,UTF-8编码的'汉' == '\xE6\xB1\x89'。 unicode才是真正意义上的字符串,对字节串str使用正确的字符编码进行解码后获得,并且len(u'汉') == 1。 再来看看encode()和decode()两个basestring的实例方法,理解了str和unicode的区别后,这两个方法就不会再混淆了: ?12345678910111213# coding: UTF-8 u = u'汉'print repr(u) # u'\u6c49's = u.encode('UTF-8')print repr(s) # '\xe6\xb1\x89'u2 = s.decode('UTF-8')print repr(u2) # u'\u6c49' # 对unicode进行解码是错误的# s2 = u.decode('UTF-8')# 同样,对str进行编码也是错误的# u2 = s.encode('UTF-8') 需要注意的是,虽然对str调用encode()方法是错误的,但实际上Python不会抛出异常,而是返回另外一个相同内容但不同id的str;对unicode调用decode()方法也是这样。很不理解为什么不把encode()和decode()分别放在unicode和str中而是都放在basestring中,但既然已经这样了,我们就小心避免犯错吧。 2.2. 字符编码声明 源代码文件中,如果有用到非ASCII字符,则需要在文件头部进行字符编码的声明,如下: ?1#-*- coding: UTF-8 -*- 实际上Python只检查#、coding和编码字符串,其他的字符都是为了美观加上的。另外,Python中可用的字符编码有很多,并且还有许多别名,还不区分大小写,比如UTF-8可以写成u8。参见http://docs.python.org/library/codecs.html#standard-encodings。 另外需要注意的是声明的编码必须与文件实际保存时用的编码一致,否则很大几率会出现代码解析异常。现在的IDE一般会自动处理这种情况,改变声明后同时换成声明的编码保存,但文本编辑器控们需要小心 :) 2.3. 读写文件 内置的open()方法打开文件时,read()读取的是str,读取后需要使用正确的编码格式进行decode()。write()写入时,如果参数是unicode,则需要使用你希望写入的编码进行encode(),如果是其他编码格式的str,则需要先用该str的编码进行decode(),转成unicode后再使用写入的编码进行encode()。如果直接将unicode作为参数传入write()方法,Python将先使用源代码文件声明的字符编码进行编码然后写入。 ?1234567891011121314# coding: UTF-8 f = open('test.txt')s = f.read()f.close()print type(s) # <type 'str'># 已知是GBK编码,解码成unicodeu = s.decode('GBK') f = open('test.txt', 'w')# 编码成UTF-8编码的strs = u.encode('UTF-8')f.write(s)f.close() 另外,模块codecs提供了一个open()方法,可以指定一个编码打开文件,使用这个方法打开的文件读取返回的将是unicode。写入时,如果参数是unicode,则使用open()时指定的编码进行编码后写入;如果是str,则先根据源代码文件声明的字符编码,解码成unicode后再进行前述操作。相对内置的open()来说,这个方法比较不容易在编码上出现问题。 ?1234567891011121314151617181920# coding: GBK import codecs f = codecs.open('test.txt', encoding='UTF-8')u = f.read()f.close()print type(u) # <type 'unicode'> f = codecs.open('test.txt', 'a', encoding='UTF-8')# 写入unicodef.write(u) # 写入str,自动进行解码编码操作# GBK编码的strs = '汉'print repr(s) # '\xba\xba'# 这里会先将GBK编码的str解码为unicode再编码为UTF-8写入f.write(s) f.close() 2.4. 与编码相关的方法 sys/locale模块中提供了一些获取当前环境下的默认编码的方法。 ?12345678910111213141516171819202122232425262728293031# coding:gbk import sysimport locale def p(f): print '%s.%s(): %s' % (f.__module__, f.__name__, f()) # 返回当前系统所使用的默认字符编码p(sys.getdefaultencoding) # 返回用于转换Unicode文件名至系统文件名所使用的编码p(sys.getfilesystemencoding) # 获取默认的区域设置并返回元祖(语言, 编码)p(locale.getdefaultlocale) # 返回用户设定的文本数据编码# 文档提到this function only returns a guessp(locale.getpreferredencoding) # \xba\xba是'汉'的GBK编码# mbcs是不推荐使用的编码,这里仅作测试表明为什么不应该用print r"'\xba\xba'.decode('mbcs'):", repr('\xba\xba'.decode('mbcs')) #在笔者的Windows上的结果(区域设置为中文(简体, 中国))#sys.getdefaultencoding(): gbk#sys.getfilesystemencoding(): mbcs#locale.getdefaultlocale(): ('zh_CN', 'cp936')#locale.getpreferredencoding(): cp936#'\xba\xba'.decode('mbcs'): u'\u6c49' 3.一些建议 3.1. 使用字符编码声明,并且同一工程中的所有源代码文件使用相同的字符编码声明。 这点是一定要做到的。 3.2. 抛弃str,全部使用unicode。 按引号前先按一下u最初做起来确实很不习惯而且经常会忘记再跑回去补,但如果这么做可以减少90%的编码问题。如果编码困扰不严重,可以不参考此条。 3.3. 使用codecs.open()替代内置的open()。 如果编码困扰不严重,可以不参考此条。 3.4. 绝对需要避免使用的字符编码:MBCS/DBCS和UTF-16。 这里说的MBCS不是指GBK什么的都不能用,而是不要使用Python里名为'MBCS'的编码,除非程序完全不移植。 Python中编码'MBCS'与'DBCS'是同义词,指当前Windows环境中MBCS指代的编码。Linux的Python实现中没有这种编码,所以一旦移植到Linux一定会出现异常!另外,只要设定的Windows系统区域不同,MBCS指代的编码也是不一样的。分别设定不同的区域运行2.4小节中的代码的结果: ?123456789101112131415161718192021222324252627#中文(简体, 中国)#sys.getdefaultencoding(): gbk#sys.getfilesystemencoding(): mbcs#locale.getdefaultlocale(): ('zh_CN', 'cp936')#locale.getpreferredencoding(): cp936#'\xba\xba'.decode('mbcs'): u'\u6c49' #英语(美国)#sys.getdefaultencoding(): UTF-8#sys.getfilesystemencoding(): mbcs#locale.getdefaultlocale(): ('zh_CN', 'cp1252')#locale.getpreferredencoding(): cp1252#'\xba\xba'.decode('mbcs'): u'\xba\xba' #德语(德国)#sys.getdefaultencoding(): gbk#sys.getfilesystemencoding(): mbcs#locale.getdefaultlocale(): ('zh_CN', 'cp1252')#locale.getpreferredencoding(): cp1252#'\xba\xba'.decode('mbcs'): u'\xba\xba' #日语(日本)#sys.getdefaultencoding(): gbk#sys.getfilesystemencoding(): mbcs#locale.getdefaultlocale(): ('zh_CN', 'cp932')#locale.getpreferredencoding(): cp932#'\xba\xba'.decode('mbcs'): u'\uff7a\uff7a' 可见,更改区域后,使用mbcs解码得到了不正确的结果,所以,当我们需要使用'GBK'时,应该直接写'GBK',不要写成'MBCS'。 UTF-16同理,虽然绝大多数操作系统中'UTF-16'是'UTF-16-LE'的同义词,但直接写'UTF-16-LE'只是多写3个字符而已,而万一某个操作系统中'UTF-16'变成了'UTF-16-BE'的同义词,就会有错误的结果。实际上,UTF-16用的相当少,但用到的时候还是需要注意。 --END--
查看详情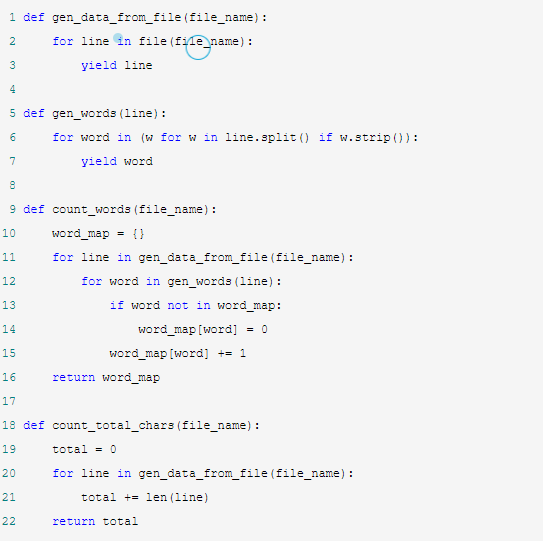
正文 本文将由浅入深详细介绍yield以及generator,包括以下内容:什么generator,生成generator的方法,generator的特点,generator基础及高级应用场景,generator使用中的注意事项。本文不包括enhanced generator即pep342相关内容,这部分内容在之后的博文介绍。 generator基础 在python的函数(function)定义中,只要出现了yield表达式(Yield expression),那么事实上定义的是一个generator function, 调用这个generator function返回值是一个generator。这根普通的函数调用有所区别,For example: def gen_generator(): yield 1 def gen_value(): return 1 if __name__ == '__main__': ret = gen_generator() print ret, type(ret) #<generator object gen_generator at 0x02645648> <type 'generator'> ret = gen_value() print ret, type(ret) # 1 <type 'int'> 从上面的代码可以看出,gen_generator函数返回的是一个generator实例,generator有以下特别: 遵循迭代器(iterator)协议,迭代器协议需要实现__iter__、next接口 能过多次进入、多次返回,能够暂停函数体中代码的执行 下面看一下测试代码: p.p1 { margin: 0; font: 11px Menlo } span.s1 { font-variant-ligatures: no-common-ligatures } >>> def gen_example(): ... print 'before any yield' ... yield 'first yield' ... print 'between yields' ... yield 'second yield' ... print 'no yield anymore' ... >>> gen = gen_example() >>> gen.next() # 第一次调用next before any yield 'first yield' >>> gen.next() # 第二次调用next between yields 'second yield' >>> gen.next() # 第三次调用next no yield anymore Traceback (most recent call last): File "<stdin>", line 1, in <module> StopIteratio 调用gen example方法并没有输出任何内容,说明函数体的代码尚未开始执行。当调用generator的next方法,generator会执行到yield 表达式处,返回yield表达式的内容,然后暂停(挂起)在这个地方,所以第一次调用next打印第一句并返回“first yield”。 暂停意味着方法的局部变量,指针信息,运行环境都保存起来,直到下一次调用next方法恢复。第二次调用next之后就暂停在最后一个yield,再次调用next()方法,则会抛出StopIteration异常。 因为for语句能自动捕获StopIteration异常,所以generator(本质上是任何iterator)较为常用的方法是在循环中使用: 1 def generator_example(): 2 yield 1 3 yield 2 4 5 if __name__ == '__main__': 6 for e in generator_example(): 7 print e 8 # output 1 2 generator function产生的generator与普通的function有什么区别呢 (1)function每次都是从第一行开始运行,而generator从上一次yield开始的地方运行 (2)function调用一次返回一个(一组)值,而generator可以多次返回 (3)function可以被无数次重复调用,而一个generator实例在yield最后一个值 或者return之后就不能继续调用了 在函数中使用Yield,然后调用该函数是生成generator的一种方式。另一种常见的方式是使用generator expression,For example: >>> gen = (x * x for x in xrange(5)) >>> print gen <generator object <genexpr> at 0x02655710> generator应用 generator基础应用 为什么使用generator呢,最重要的原因是可以按需生成并“返回”结果,而不是一次性产生所有的返回值,况且有时候根本就不知道“所有的返回值”。比如对于下面的代码 1 RANGE_NUM = 100 2 for i in [x*x for x in range(RANGE_NUM)]: # 第一种方法:对列表进行迭代 3 # do sth for example 4 print i 5 6 for i in (x*x for x in range(RANGE_NUM)): # 第二种方法:对generator进行迭代 7 # do sth for example 8 print i 在上面的代码中,两个for语句输出是一样的,代码字面上看来也就是中括号与小括号的区别。但这点区别差异是很大的,第一种方法返回值是一个列表,第二个方法返回的是一个generator对象。随着RANGE_NUM的变大,第一种方法返回的列表也越大,占用的内存也越大;但是对于第二种方法没有任何区别。 我们再来看一个可以“返回”无穷多次的例子: def fib(): a, b = 1, 1 while True: yield a a, b = b, a+b 这个generator拥有生成无数多“返回值”的能力,使用者可以自己决定什么时候停止迭代 generator高级应用 使用场景一: Generator可用于产生数据流, generator并不立刻产生返回值,而是等到被需要的时候才会产生返回值,相当于一个主动拉取的过程(pull),比如现在有一个日志文件,每行产生一条记录,对于每一条记录,不同部门的人可能处理方式不同,但是我们可以提供一个公用的、按需生成的数据流。 1 def gen_data_from_file(file_name): 2 for line in file(file_name): 3 yield line 4 5 def gen_words(line): 6 for word in (w for w in line.split() if w.strip()): 7 yield word 8 9 def count_words(file_name): 10 word_map = {} 11 for line in gen_data_from_file(file_name): 12 for word in gen_words(line): 13 if word not in word_map: 14 word_map[word] = 0 15 word_map[word] += 1 16 return word_map 17 18 def count_total_chars(file_name): 19 total = 0 20 for line in gen_data_from_file(file_name): 21 total += len(line) 22 return total 23 24 if __name__ == '__main__': 25 print count_words('test.txt'), count_total_chars('test.txt') 上面的例子来自08年的PyCon一个讲座。gen_words gen_data_from_file是数据生产者,而count_words count_total_chars是数据的消费者。可以看到,数据只有在需要的时候去拉取的,而不是提前准备好。另外gen_words中 (w for w in line.split() if w.strip()) 也是产生了一个generator 使用场景二: 一些编程场景中,一件事情可能需要执行一部分逻辑,然后等待一段时间、或者等待某个异步的结果、或者等待某个状态,然后继续执行另一部分逻辑。比如微服务架构中,服务A执行了一段逻辑之后,去服务B请求一些数据,然后在服务A上继续执行。或者在游戏编程中,一个技能分成分多段,先执行一部分动作(效果),然后等待一段时间,然后再继续。对于这种需要等待、而又不希望阻塞的情况,我们一般使用回调(callback)的方式。下面举一个简单的例子: 1 def do(a): 2 print 'do', a 3 CallBackMgr.callback(5, lambda a = a: post_do(a)) 4 5 def post_do(a): 6 print 'post_do', a 这里的CallBackMgr注册了一个5s后的时间,5s之后再调用lambda函数,可见一段逻辑被分裂到两个函数,而且还需要上下文的传递(如这里的参数a)。我们用yield来修改一下这个例子,yield返回值代表等待的时间。 1 @yield_dec 2 def do(a): 3 print 'do', a 4 yield 5 5 print 'post_do', a 这里需要实现一个YieldManager, 通过yield_dec这个decrator将do这个generator注册到YieldManager,并在5s后调用next方法。Yield版本实现了和回调一样的功能,但是看起来要清晰许多。下面给出一个简单的实现以供参考: # -*- coding:utf-8 -*- import sys # import Timer import types import time class YieldManager(object): def __init__(self, tick_delta = 0.01): self.generator_dict = {} # self._tick_timer = Timer.addRepeatTimer(tick_delta, lambda: self.tick()) def tick(self): cur = time.time() for gene, t in self.generator_dict.items(): if cur >= t: self._do_resume_genetator(gene,cur) def _do_resume_genetator(self,gene, cur ): try: self.on_generator_excute(gene, cur) except StopIteration,e: self.remove_generator(gene) except Exception, e: print 'unexcepet error', type(e) self.remove_generator(gene) def add_generator(self, gen, deadline): self.generator_dict[gen] = deadline def remove_generator(self, gene): del self.generator_dict[gene] def on_generator_excute(self, gen, cur_time = None): t = gen.next() cur_time = cur_time or time.time() self.add_generator(gen, t + cur_time) g_yield_mgr = YieldManager() def yield_dec(func): def _inner_func(*args, **kwargs): gen = func(*args, **kwargs) if type(gen) is types.GeneratorType: g_yield_mgr.on_generator_excute(gen) return gen return _inner_func @yield_dec def do(a): print 'do', a yield 2.5 print 'post_do', a yield 3 print 'post_do again', a if __name__ == '__main__': do(1) for i in range(1, 10): print 'simulate a timer, %s seconds passed' % i time.sleep(1) g_yield_mgr.tick() 注意事项: (1)Yield是不能嵌套的! 1 def visit(data): 2 for elem in data: 3 if isinstance(elem, tuple) or isinstance(elem, list): 4 visit(elem) # here value retuened is generator 5 else: 6 yield elem 7 8 if __name__ == '__main__': 9 for e in visit([1, 2, (3, 4), 5]): 10 print e 上面的代码访问嵌套序列里面的每一个元素,我们期望的输出是1 2 3 4 5,而实际输出是1 2 5 。为什么呢,如注释所示,visit是一个generator function,所以第4行返回的是generator object,而代码也没这个generator实例迭代。那么改改代码,对这个临时的generator 进行迭代就行了。 def visit(data): for elem in data: if isinstance(elem, tuple) or isinstance(elem, list): for e in visit(elem): yield e else: yield elem 或者在python3.3中 可以使用yield from,这个语法是在pep380加入的 1 def visit(data): 2 for elem in data: 3 if isinstance(elem, tuple) or isinstance(elem, list): 4 yield from visit(elem) 5 else: 6 yield elem (2)generator function中使用return 在python doc中,明确提到是可以使用return的,当generator执行到这里的时候抛出StopIteration异常。 1 def gen_with_return(range_num): 2 if range_num < 0: 3 return 4 else: 5 for i in xrange(range_num): 6 yield i 7 8 if __name__ == '__main__': 9 print list(gen_with_return(-1)) 10 print list(gen_with_return(1)) 但是,generator function中的return是不能带任何返回值的 1 def gen_with_return(range_num): 2 if range_num < 0: 3 return 0 4 else: 5 for i in xrange(range_num): 6 yield i 上面的代码会报错:SyntaxError: 'return' with argument inside generator
查看详情
一、初始化 假设已经安装了matplotlib工具包。 利用matplotlib.figure.Figure创建一个图框: ?1234import matplotlib.pyplot as pltfrom mpl_toolkits.mplot3d import Axes3Dfig = plt.figure()ax = fig.add_subplot(111, projection='3d') 二、直线绘制(Line plots) 基本用法: ?1ax.plot(x,y,z,label=' ') code: ?123456789101112131415161718import matplotlib as mplfrom mpl_toolkits.mplot3d import Axes3Dimport numpy as npimport matplotlib.pyplot as plt mpl.rcParams['legend.fontsize'] = 10 fig = plt.figure()ax = fig.gca(projection='3d')theta = np.linspace(-4 * np.pi, 4 * np.pi, 100)z = np.linspace(-2, 2, 100)r = z**2 + 1x = r * np.sin(theta)y = r * np.cos(theta)ax.plot(x, y, z, label='parametric curve')ax.legend() plt.show() 三、散点绘制(Scatter plots) 基本用法: ?1ax.scatter(xs, ys, zs, s=20, c=None, depthshade=True, *args, *kwargs) xs,ys,zs:输入数据; s:scatter点的尺寸 c:颜色,如c = 'r'就是红色; depthshase:透明化,True为透明,默认为True,False为不透明 *args等为扩展变量,如maker = 'o',则scatter结果为’o‘的形状 code: ?123456789101112131415161718192021222324252627282930from mpl_toolkits.mplot3d import Axes3Dimport matplotlib.pyplot as pltimport numpy as np def randrange(n, vmin, vmax): ''' Helper function to make an array of random numbers having shape (n, ) with each number distributed Uniform(vmin, vmax). ''' return (vmax - vmin)*np.random.rand(n) + vmin fig = plt.figure()ax = fig.add_subplot(111, projection='3d') n = 100 # For each set of style and range settings, plot n random points in the box# defined by x in [23, 32], y in [0, 100], z in [zlow, zhigh].for c, m, zlow, zhigh in [('r', 'o', -50, -25), ('b', '^', -30, -5)]: xs = randrange(n, 23, 32) ys = randrange(n, 0, 100) zs = randrange(n, zlow, zhigh) ax.scatter(xs, ys, zs, c=c, marker=m) ax.set_xlabel('X Label')ax.set_ylabel('Y Label')ax.set_zlabel('Z Label') plt.show() 四、线框图(Wireframe plots) 基本用法: ?1ax.plot_wireframe(X, Y, Z, *args, **kwargs) X,Y,Z:输入数据 rstride:行步长 cstride:列步长 rcount:行数上限 ccount:列数上限 code: ?1234567891011121314from mpl_toolkits.mplot3d import axes3dimport matplotlib.pyplot as plt fig = plt.figure()ax = fig.add_subplot(111, projection='3d') # Grab some test data.X, Y, Z = axes3d.get_test_data(0.05) # Plot a basic wireframe.ax.plot_wireframe(X, Y, Z, rstride=10, cstride=10) plt.show() 五、表面图(Surface plots) 基本用法: ?1ax.plot_surface(X, Y, Z, *args, **kwargs) X,Y,Z:数据 rstride、cstride、rcount、ccount:同Wireframe plots定义 color:表面颜色 cmap:图层 code: ?123456789101112131415161718192021222324252627282930from mpl_toolkits.mplot3d import Axes3Dimport matplotlib.pyplot as pltfrom matplotlib import cmfrom matplotlib.ticker import LinearLocator, FormatStrFormatterimport numpy as np fig = plt.figure()ax = fig.gca(projection='3d') # Make data.X = np.arange(-5, 5, 0.25)Y = np.arange(-5, 5, 0.25)X, Y = np.meshgrid(X, Y)R = np.sqrt(X**2 + Y**2)Z = np.sin(R) # Plot the surface.surf = ax.plot_surface(X, Y, Z, cmap=cm.coolwarm, linewidth=0, antialiased=False) # Customize the z axis.ax.set_zlim(-1.01, 1.01)ax.zaxis.set_major_locator(LinearLocator(10))ax.zaxis.set_major_formatter(FormatStrFormatter('%.02f')) # Add a color bar which maps values to colors.fig.colorbar(surf, shrink=0.5, aspect=5) plt.show() 六、三角表面图(Tri-Surface plots) 基本用法: ?1ax.plot_trisurf(*args, **kwargs) X,Y,Z:数据 其他参数类似surface-plot code: ?123456789101112131415161718192021222324252627282930from mpl_toolkits.mplot3d import Axes3Dimport matplotlib.pyplot as pltimport numpy as np n_radii = 8n_angles = 36 # Make radii and angles spaces (radius r=0 omitted to eliminate duplication).radii = np.linspace(0.125, 1.0, n_radii)angles = np.linspace(0, 2*np.pi, n_angles, endpoint=False) # Repeat all angles for each radius.angles = np.repeat(angles[..., np.newaxis], n_radii, axis=1) # Convert polar (radii, angles) coords to cartesian (x, y) coords.# (0, 0) is manually added at this stage, so there will be no duplicate# points in the (x, y) plane.x = np.append(0, (radii*np.cos(angles)).flatten())y = np.append(0, (radii*np.sin(angles)).flatten()) # Compute z to make the pringle surface.z = np.sin(-x*y) fig = plt.figure()ax = fig.gca(projection='3d') ax.plot_trisurf(x, y, z, linewidth=0.2, antialiased=True) plt.show() 七、等高线(Contour plots) 基本用法: ?1ax.contour(X, Y, Z, *args, **kwargs) code: ?1234567891011from mpl_toolkits.mplot3d import axes3dimport matplotlib.pyplot as pltfrom matplotlib import cm fig = plt.figure()ax = fig.add_subplot(111, projection='3d')X, Y, Z = axes3d.get_test_data(0.05)cset = ax.contour(X, Y, Z, cmap=cm.coolwarm)ax.clabel(cset, fontsize=9, inline=1) plt.show() 二维的等高线,同样可以配合三维表面图一起绘制: code: ?123456789101112131415161718192021from mpl_toolkits.mplot3d import axes3dfrom mpl_toolkits.mplot3d import axes3dimport matplotlib.pyplot as pltfrom matplotlib import cm fig = plt.figure()ax = fig.gca(projection='3d')X, Y, Z = axes3d.get_test_data(0.05)ax.plot_surface(X, Y, Z, rstride=8, cstride=8, alpha=0.3)cset = ax.contour(X, Y, Z, zdir='z', offset=-100, cmap=cm.coolwarm)cset = ax.contour(X, Y, Z, zdir='x', offset=-40, cmap=cm.coolwarm)cset = ax.contour(X, Y, Z, zdir='y', offset=40, cmap=cm.coolwarm) ax.set_xlabel('X')ax.set_xlim(-40, 40)ax.set_ylabel('Y')ax.set_ylim(-40, 40)ax.set_zlabel('Z')ax.set_zlim(-100, 100) plt.show() 也可以是三维等高线在二维平面的投影: code: ?1234567891011121314151617181920from mpl_toolkits.mplot3d import axes3dimport matplotlib.pyplot as pltfrom matplotlib import cm fig = plt.figure()ax = fig.gca(projection='3d')X, Y, Z = axes3d.get_test_data(0.05)ax.plot_surface(X, Y, Z, rstride=8, cstride=8, alpha=0.3)cset = ax.contourf(X, Y, Z, zdir='z', offset=-100, cmap=cm.coolwarm)cset = ax.contourf(X, Y, Z, zdir='x', offset=-40, cmap=cm.coolwarm)cset = ax.contourf(X, Y, Z, zdir='y', offset=40, cmap=cm.coolwarm) ax.set_xlabel('X')ax.set_xlim(-40, 40)ax.set_ylabel('Y')ax.set_ylim(-40, 40)ax.set_zlabel('Z')ax.set_zlim(-100, 100) plt.show() 八、Bar plots(条形图) 基本用法: ?1ax.bar(left, height, zs=0, zdir='z', *args, **kwargs x,y,zs = z,数据 zdir:条形图平面化的方向,具体可以对应代码理解。 code: ?123456789101112131415161718192021from mpl_toolkits.mplot3d import Axes3Dimport matplotlib.pyplot as pltimport numpy as np fig = plt.figure()ax = fig.add_subplot(111, projection='3d')for c, z in zip(['r', 'g', 'b', 'y'], [30, 20, 10, 0]): xs = np.arange(20) ys = np.random.rand(20) # You can provide either a single color or an array. To demonstrate this, # the first bar of each set will be colored cyan. cs = [c] * len(xs) cs[0] = 'c' ax.bar(xs, ys, zs=z, zdir='y', color=cs, alpha=0.8) ax.set_xlabel('X')ax.set_ylabel('Y')ax.set_zlabel('Z') plt.show() 九、子图绘制(subplot) A-不同的2-D图形,分布在3-D空间,其实就是投影空间不空,对应code: ?12345678910111213141516171819202122232425262728293031from mpl_toolkits.mplot3d import Axes3Dimport numpy as npimport matplotlib.pyplot as plt fig = plt.figure()ax = fig.gca(projection='3d') # Plot a sin curve using the x and y axes.x = np.linspace(0, 1, 100)y = np.sin(x * 2 * np.pi) / 2 + 0.5ax.plot(x, y, zs=0, zdir='z', label='curve in (x,y)') # Plot scatterplot data (20 2D points per colour) on the x and z axes.colors = ('r', 'g', 'b', 'k')x = np.random.sample(20*len(colors))y = np.random.sample(20*len(colors))c_list = []for c in colors: c_list.append([c]*20)# By using zdir='y', the y value of these points is fixed to the zs value 0# and the (x,y) points are plotted on the x and z axes.ax.scatter(x, y, zs=0, zdir='y', c=c_list, label='points in (x,z)') # Make legend, set axes limits and labelsax.legend()ax.set_xlim(0, 1)ax.set_ylim(0, 1)ax.set_zlim(0, 1)ax.set_xlabel('X')ax.set_ylabel('Y')ax.set_zlabel('Z') B-子图Subplot用法 与MATLAB不同的是,如果一个四子图效果,如: MATLAB: ?123subplot(2,2,1)subplot(2,2,2)subplot(2,2,[3,4]) Python: ?123subplot(2,2,1)subplot(2,2,2)subplot(2,1,2) code: ?12345678910111213141516171819202122232425262728293031323334353637import matplotlib.pyplot as pltfrom mpl_toolkits.mplot3d.axes3d import Axes3D, get_test_datafrom matplotlib import cmimport numpy as np # set up a figure twice as wide as it is tallfig = plt.figure(figsize=plt.figaspect(0.5)) #===============# First subplot#===============# set up the axes for the first plotax = fig.add_subplot(2, 2, 1, projection='3d') # plot a 3D surface like in the example mplot3d/surface3d_demoX = np.arange(-5, 5, 0.25)Y = np.arange(-5, 5, 0.25)X, Y = np.meshgrid(X, Y)R = np.sqrt(X**2 + Y**2)Z = np.sin(R)surf = ax.plot_surface(X, Y, Z, rstride=1, cstride=1, cmap=cm.coolwarm, linewidth=0, antialiased=False)ax.set_zlim(-1.01, 1.01)fig.colorbar(surf, shrink=0.5, aspect=10) #===============# Second subplot#===============# set up the axes for the second plotax = fig.add_subplot(2,1,2, projection='3d') # plot a 3D wireframe like in the example mplot3d/wire3d_demoX, Y, Z = get_test_data(0.05)ax.plot_wireframe(X, Y, Z, rstride=10, cstride=10) plt.show() 补充: 文本注释的基本用法: code: ?123456789101112131415161718192021222324252627282930313233from mpl_toolkits.mplot3d import Axes3Dimport matplotlib.pyplot as plt fig = plt.figure()ax = fig.gca(projection='3d') # Demo 1: zdirzdirs = (None, 'x', 'y', 'z', (1, 1, 0), (1, 1, 1))xs = (1, 4, 4, 9, 4, 1)ys = (2, 5, 8, 10, 1, 2)zs = (10, 3, 8, 9, 1, 8) for zdir, x, y, z in zip(zdirs, xs, ys, zs): label = '(%d, %d, %d), dir=%s' % (x, y, z, zdir) ax.text(x, y, z, label, zdir) # Demo 2: colorax.text(9, 0, 0, "red", color='red') # Demo 3: text2D# Placement 0, 0 would be the bottom left, 1, 1 would be the top right.ax.text2D(0.05, 0.95, "2D Text", transform=ax.transAxes) # Tweaking display region and labelsax.set_xlim(0, 10)ax.set_ylim(0, 10)ax.set_zlim(0, 10)ax.set_xlabel('X axis')ax.set_ylabel('Y axis')ax.set_zlabel('Z axis') plt.show()
查看详情
首先通过一个例子来看一下本文中可能用到的对象和相关概念。 ?123456789101112131415#coding: UTF-8import sys # 模块,sys指向这个模块对象import inspectdef foo(): pass # 函数,foo指向这个函数对象 class Cat(object): # 类,Cat指向这个类对象 def __init__(self, name='kitty'): self.name = name def sayHi(self): # 实例方法,sayHi指向这个方法对象,使用类或实例.sayHi访问 print self.name, 'says Hi!' # 访问名为name的字段,使用实例.name访问 cat = Cat() # cat是Cat类的实例对象 print Cat.sayHi # 使用类名访问实例方法时,方法是未绑定的(unbound)print cat.sayHi # 使用实例访问实例方法时,方法是绑定的(bound) 有时候我们会碰到这样的需求,需要执行对象的某个方法,或是需要对对象的某个字段赋值,而方法名或是字段名在编码代码时并不能确定,需要通过参数传递字符串的形式输入。举个具体的例子:当我们需要实现一个通用的DBM框架时,可能需要对数据对象的字段赋值,但我们无法预知用到这个框架的数据对象都有些什么字段,换言之,我们在写框架的时候需要通过某种机制访问未知的属性。 这个机制被称为反射(反过来让对象告诉我们他是什么),或是自省(让对象自己告诉我们他是什么,好吧我承认括号里是我瞎掰的- -#),用于实现在运行时获取未知对象的信息。反射是个很吓唬人的名词,听起来高深莫测,在一般的编程语言里反射相对其他概念来说稍显复杂,一般来说都是作为高级主题来讲;但在Python中反射非常简单,用起来几乎感觉不到与其他的代码有区别,使用反射获取到的函数和方法可以像平常一样加上括号直接调用,获取到类后可以直接构造实例;不过获取到的字段不能直接赋值,因为拿到的其实是另一个指向同一个地方的引用,赋值只能改变当前的这个引用而已。 1. 访问对象的属性 以下列出了几个内建方法,可以用来检查或是访问对象的属性。这些方法可以用于任意对象而不仅仅是例子中的Cat实例对象;Python中一切都是对象。 ?1234567891011cat = Cat('kitty') print cat.name # 访问实例属性cat.sayHi() # 调用实例方法 print dir(cat) # 获取实例的属性名,以列表形式返回if hasattr(cat, 'name'): # 检查实例是否有这个属性 setattr(cat, 'name', 'tiger') # same as: a.name = 'tiger'print getattr(cat, 'name') # same as: print a.name getattr(cat, 'sayHi')() # same as: cat.sayHi() dir([obj]): 调用这个方法将返回包含obj大多数属性名的列表(会有一些特殊的属性不包含在内)。obj的默认值是当前的模块对象。 hasattr(obj, attr): 这个方法用于检查obj是否有一个名为attr的值的属性,返回一个布尔值。 getattr(obj, attr): 调用这个方法将返回obj中名为attr值的属性的值,例如如果attr为'bar',则返回obj.bar。 setattr(obj, attr, val): 调用这个方法将给obj的名为attr的值的属性赋值为val。例如如果attr为'bar',则相当于obj.bar = val。 2. 访问对象的元数据 当你对一个你构造的对象使用dir()时,可能会发现列表中的很多属性并不是你定义的。这些属性一般保存了对象的元数据,比如类的__name__属性保存了类名。大部分这些属性都可以修改,不过改动它们意义并不是很大;修改其中某些属性如function.func_code还可能导致很难发现的问题,所以改改name什么的就好了,其他的属性不要在不了解后果的情况下修改。 接下来列出特定对象的一些特殊属性。另外,Python的文档中有提到部分属性不一定会一直提供,下文中将以红色的星号*标记,使用前你可以先打开解释器确认一下。 2.0. 准备工作:确定对象的类型 在types模块中定义了全部的Python内置类型,结合内置方法isinstance()就可以确定对象的具体类型了。 isinstance(object, classinfo): 检查object是不是classinfo中列举出的类型,返回布尔值。classinfo可以是一个具体的类型,也可以是多个类型的元组或列表。 types模块中仅仅定义了类型,而inspect模块中封装了很多检查类型的方法,比直接使用types模块更为轻松,所以这里不给出关于types的更多介绍,如有需要可以直接查看types模块的文档说明。本文第3节中介绍了inspect模块。 2.1. 模块(module) __doc__: 文档字符串。如果模块没有文档,这个值是None。 *__name__: 始终是定义时的模块名;即使你使用import .. as 为它取了别名,或是赋值给了另一个变量名。 *__dict__: 包含了模块里可用的属性名-属性的字典;也就是可以使用模块名.属性名访问的对象。 __file__: 包含了该模块的文件路径。需要注意的是内建的模块没有这个属性,访问它会抛出异常! ?12345import fnmatch as mprint m.__doc__.splitlines()[0] # Filename matching with shell patterns.print m.__name__ # fnmatchprint m.__file__ # /usr/lib/python2.6/fnmatch.pycprint m.__dict__.items()[0] # ('fnmatchcase', <function>)</function> 2.2. 类(class) __doc__: 文档字符串。如果类没有文档,这个值是None。 *__name__: 始终是定义时的类名。 *__dict__: 包含了类里可用的属性名-属性的字典;也就是可以使用类名.属性名访问的对象。 __module__: 包含该类的定义的模块名;需要注意,是字符串形式的模块名而不是模块对象。 *__bases__: 直接父类对象的元组;但不包含继承树更上层的其他类,比如父类的父类。 ?12345print Cat.__doc__ # Noneprint Cat.__name__ # Catprint Cat.__module__ # __main__print Cat.__bases__ # (<type>,)print Cat.__dict__ # {'__module__': '__main__', ...}</type> 2.3. 实例(instance) 实例是指类实例化以后的对象。 *__dict__: 包含了可用的属性名-属性字典。 *__class__: 该实例的类对象。对于类Cat,cat.__class__ == Cat 为 True。 ?123print cat.__dict__print cat.__class__print cat.__class__ == Cat # True 2.4. 内建函数和方法(built-in functions and methods) 根据定义,内建的(built-in)模块是指使用C写的模块,可以通过sys模块的builtin_module_names字段查看都有哪些模块是内建的。这些模块中的函数和方法可以使用的属性比较少,不过一般也不需要在代码中查看它们的信息。 __doc__: 函数或方法的文档。 __name__: 函数或方法定义时的名字。 __self__: 仅方法可用,如果是绑定的(bound),则指向调用该方法的类(如果是类方法)或实例(如果是实例方法),否则为None。 *__module__: 函数或方法所在的模块名。 2.5. 函数(function) 这里特指非内建的函数。注意,在类中使用def定义的是方法,方法与函数虽然有相似的行为,但它们是不同的概念。 __doc__: 函数的文档;另外也可以用属性名func_doc。 __name__: 函数定义时的函数名;另外也可以用属性名func_name。 *__module__: 包含该函数定义的模块名;同样注意,是模块名而不是模块对象。 *__dict__: 函数的可用属性;另外也可以用属性名func_dict。 不要忘了函数也是对象,可以使用函数.属性名访问属性(赋值时如果属性不存在将新增一个),或使用内置函数has/get/setattr()访问。不过,在函数中保存属性的意义并不大。 func_defaults: 这个属性保存了函数的参数默认值元组;因为默认值总是靠后的参数才有,所以不使用字典的形式也是可以与参数对应上的。 func_code: 这个属性指向一个该函数对应的code对象,code对象中定义了其他的一些特殊属性,将在下文中另外介绍。 func_globals: 这个属性指向定义函数时的全局命名空间。 *func_closure: 这个属性仅当函数是一个闭包时有效,指向一个保存了所引用到的外部函数的变量cell的元组,如果该函数不是一个内部函数,则始终为None。这个属性也是只读的。 下面的代码演示了func_closure: ?123456789101112#coding: UTF-8def foo(): n = 1 def bar(): print n # 引用非全局的外部变量n,构造一个闭包 n = 2 return bar closure = foo()print closure.func_closure# 使用dir()得知cell对象有一个cell_contents属性可以获得值print closure.func_closure[0].cell_contents # 2 由这个例子可以看到,遇到未知的对象使用dir()是一个很好的主意 :) 2.6. 方法(method) 方法虽然不是函数,但可以理解为在函数外面加了一层外壳;拿到方法里实际的函数以后,就可以使用2.5节的属性了。 __doc__: 与函数相同。 __name__: 与函数相同。 *__module__: 与函数相同。 im_func: 使用这个属性可以拿到方法里实际的函数对象的引用。另外如果是2.6以上的版本,还可以使用属性名__func__。 im_self: 如果是绑定的(bound),则指向调用该方法的类(如果是类方法)或实例(如果是实例方法),否则为None。如果是2.6以上的版本,还可以使用属性名__self__。 im_class: 实际调用该方法的类,或实际调用该方法的实例的类。注意不是方法的定义所在的类,如果有继承关系的话。 ?1234im = cat.sayHiprint im.im_funcprint im.im_self # catprint im.im_class # Cat 这里讨论的是一般的实例方法,另外还有两种特殊的方法分别是类方法(classmethod)和静态方法(staticmethod)。类方法还是方法,不过因为需要使用类名调用,所以他始终是绑定的;而静态方法可以看成是在类的命名空间里的函数(需要使用类名调用的函数),它只能使用函数的属性,不能使用方法的属性。 2.7. 生成器(generator) 生成器是调用一个生成器函数(generator function)返回的对象,多用于集合对象的迭代。 __iter__: 仅仅是一个可迭代的标记。 gi_code: 生成器对应的code对象。 gi_frame: 生成器对应的frame对象。 gi_running: 生成器函数是否在执行。生成器函数在yield以后、执行yield的下一行代码前处于frozen状态,此时这个属性的值为0。 next|close|send|throw: 这是几个可调用的方法,并不包含元数据信息,如何使用可以查看生成器的相关文档。 ?123456789101112def gen(): for n in xrange(5): yield ng = gen()print g # <generator object gen at 0x...>print g.gi_code # <code object gen at 0x...>print g.gi_frame # <frame object at 0x...>print g.gi_running # 0print g.next() # 0print g.next() # 1for n in g: print n, # 2 3 4 接下来讨论的是几个不常用到的内置对象类型。这些类型在正常的编码过程中应该很少接触,除非你正在自己实现一个解释器或开发环境之类。所以这里只列出一部分属性,如果需要一份完整的属性表或想进一步了解,可以查看文末列出的参考文档。 2.8. 代码块(code) 代码块可以由类源代码、函数源代码或是一个简单的语句代码编译得到。这里我们只考虑它指代一个函数时的情况;2.5节中我们曾提到可以使用函数的func_code属性获取到它。code的属性全部是只读的。 co_argcount: 普通参数的总数,不包括*参数和**参数。 co_names: 所有的参数名(包括*参数和**参数)和局部变量名的元组。 co_varnames: 所有的局部变量名的元组。 co_filename: 源代码所在的文件名。 co_flags: 这是一个数值,每一个二进制位都包含了特定信息。较关注的是0b100(0x4)和0b1000(0x8),如果co_flags & 0b100 != 0,说明使用了*args参数;如果co_flags & 0b1000 != 0,说明使用了**kwargs参数。另外,如果co_flags & 0b100000(0x20) != 0,则说明这是一个生成器函数(generator function)。 ?12345co = cat.sayHi.func_codeprint co.co_argcount # 1print co.co_names # ('name',)print co.co_varnames # ('self',)print co.co_flags & 0b100 # 0 2.9. 栈帧(frame) 栈帧表示程序运行时函数调用栈中的某一帧。函数没有属性可以获取它,因为它在函数调用时才会产生,而生成器则是由函数调用返回的,所以有属性指向栈帧。想要获得某个函数相关的栈帧,则必须在调用这个函数且这个函数尚未返回时获取。你可以使用sys模块的_getframe()函数、或inspect模块的currentframe()函数获取当前栈帧。这里列出来的属性全部是只读的。 f_back: 调用栈的前一帧。 f_code: 栈帧对应的code对象。 f_locals: 用在当前栈帧时与内建函数locals()相同,但你可以先获取其他帧然后使用这个属性获取那个帧的locals()。 f_globals: 用在当前栈帧时与内建函数globals()相同,但你可以先获取其他帧……。 ?123456def add(x, y=1): f = inspect.currentframe() print f.f_locals # same as locals() print f.f_back # <frame object at 0x...> return x+yadd(2) 2.10. 追踪(traceback) 追踪是在出现异常时用于回溯的对象,与栈帧相反。由于异常时才会构建,而异常未捕获时会一直向外层栈帧抛出,所以需要使用try才能见到这个对象。你可以使用sys模块的exc_info()函数获得它,这个函数返回一个元组,元素分别是异常类型、异常对象、追踪。traceback的属性全部是只读的。 tb_next: 追踪的下一个追踪对象。 tb_frame: 当前追踪对应的栈帧。 tb_lineno: 当前追踪的行号。 ?12345678def div(x, y): try: return x/y except: tb = sys.exc_info()[2] # return (exc_type, exc_value, traceback) print tb print tb.tb_lineno # "return x/y" 的行号div(1, 0) 3. 使用inspect模块 inspect模块提供了一系列函数用于帮助使用自省。下面仅列出较常用的一些函数,想获得全部的函数资料可以查看inspect模块的文档。 3.1. 检查对象类型 is{module|class|function|method|builtin}(obj): 检查对象是否为模块、类、函数、方法、内建函数或方法。 isroutine(obj): 用于检查对象是否为函数、方法、内建函数或方法等等可调用类型。用这个方法会比多个is*()更方便,不过它的实现仍然是用了多个is*()。 ?123im = cat.sayHiif inspect.isroutine(im): im() 对于实现了__call__的类实例,这个方法会返回False。如果目的是只要可以直接调用就需要是True的话,不妨使用isinstance(obj, collections.Callable)这种形式。我也不知道为什么Callable会在collections模块中,抱歉!我猜大概是因为collections模块中包含了很多其他的ABC(Abstract Base Class)的缘故吧:) 3.2. 获取对象信息 getmembers(object[, predicate]): 这个方法是dir()的扩展版,它会将dir()找到的名字对应的属性一并返回,形如[(name, value), ...]。另外,predicate是一个方法的引用,如果指定,则应当接受value作为参数并返回一个布尔值,如果为False,相应的属性将不会返回。使用is*作为第二个参数可以过滤出指定类型的属性。 getmodule(object): 还在为第2节中的__module__属性只返回字符串而遗憾吗?这个方法一定可以满足你,它返回object的定义所在的模块对象。 get{file|sourcefile}(object): 获取object的定义所在的模块的文件名|源代码文件名(如果没有则返回None)。用于内建的对象(内建模块、类、函数、方法)上时会抛出TypeError异常。 get{source|sourcelines}(object): 获取object的定义的源代码,以字符串|字符串列表返回。代码无法访问时会抛出IOError异常。只能用于module/class/function/method/code/frame/traceack对象。 getargspec(func): 仅用于方法,获取方法声明的参数,返回元组,分别是(普通参数名的列表, *参数名, **参数名, 默认值元组)。如果没有值,将是空列表和3个None。如果是2.6以上版本,将返回一个命名元组(Named Tuple),即除了索引外还可以使用属性名访问元组中的元素。 ?1234def add(x, y=1, *z): return x + y + sum(z)print inspect.getargspec(add)#ArgSpec(args=['x', 'y'], varargs='z', keywords=None, defaults=(1,)) getargvalues(frame): 仅用于栈帧,获取栈帧中保存的该次函数调用的参数值,返回元组,分别是(普通参数名的列表, *参数名, **参数名, 帧的locals())。如果是2.6以上版本,将返回一个命名元组(Named Tuple),即除了索引外还可以使用属性名访问元组中的元素。 ?12345def add(x, y=1, *z): print inspect.getargvalues(inspect.currentframe()) return x + y + sum(z)add(2)#ArgInfo(args=['x', 'y'], varargs='z', keywords=None, locals={'y': 1, 'x': 2, 'z': ()}) getcallargs(func[, *args][, **kwds]): 返回使用args和kwds调用该方法时各参数对应的值的字典。这个方法仅在2.7版本中才有。 getmro(cls): 返回一个类型元组,查找类属性时按照这个元组中的顺序。如果是新式类,与cls.__mro__结果一样。但旧式类没有__mro__这个属性,直接使用这个属性会报异常,所以这个方法还是有它的价值的。 ?12345678print inspect.getmro(Cat)#(<class '__main__.Cat'>, <type 'object'>)print Cat.__mro__#(<class '__main__.Cat'>, <type 'object'>)class Dog: passprint inspect.getmro(Dog)#(<class __main__.Dog at 0x...>,)print Dog.__mro__ # AttributeError currentframe(): 返回当前的栈帧对象。
查看详情
大致介绍 在python爬虫爬取某些网站的验证码的时候可能会遇到验证码识别的问题,现在的验证码大多分为四类: 1、计算验证码 2、滑块验证码 3、识图验证码 4、语音验证码 这篇博客主要写的就是识图验证码,识别的是简单的验证码,要想让识别率更高,识别的更加准确就需要花很多的精力去训练自己的字体库。 识别验证码通常是这几个步骤: 1、灰度处理 2、二值化 3、去除边框(如果有的话) 4、降噪 5、切割字符或者倾斜度矫正 6、训练字体库 7、识别 这6个步骤中前三个步骤是基本的,4或者5可根据实际情况选择是否需要,并不一定切割验证码,识别率就会上升很多有时候还会下降 这篇博客不涉及训练字体库的内容,请自行搜索。同样也不讲解基础的语法。 用到的几个主要的python库: Pillow(python图像处理库)、OpenCV(高级图像处理库)、pytesseract(识别库) 灰度处理&二值化 灰度处理,就是把彩色的验证码图片转为灰色的图片。 二值化,是将图片处理为只有黑白两色的图片,利于后面的图像处理和识别 在OpenCV中有现成的方法可以进行灰度处理和二值化,处理后的效果: 代码: 1 # 自适应阀值二值化 2 def _get_dynamic_binary_image(filedir, img_name): 3 filename = './out_img/' + img_name.split('.')[0] + '-binary.jpg' 4 img_name = filedir + '/' + img_name 5 print('.....' + img_name) 6 im = cv2.imread(img_name) 7 im = cv2.cvtColor(im,cv2.COLOR_BGR2GRAY) #灰值化 8 # 二值化 9 th1 = cv2.adaptiveThreshold(im, 255, cv2.ADAPTIVE_THRESH_GAUSSIAN_C, cv2.THRESH_BINARY, 21, 1) 10 cv2.imwrite(filename,th1) 11 return th1 去除边框 如果验证码有边框,那我们就需要去除边框,去除边框就是遍历像素点,找到四个边框上的所有点,把他们都改为白色,我这里边框是两个像素宽 注意:在用OpenCV时,图片的矩阵点是反的,就是长和宽是颠倒的 代码: # 去除边框 def clear_border(img,img_name): filename = './out_img/' + img_name.split('.')[0] + '-clearBorder.jpg' h, w = img.shape[:2] for y in range(0, w): for x in range(0, h): if y < 2 or y > w - 2: img[x, y] = 255 if x < 2 or x > h -2: img[x, y] = 255 cv2.imwrite(filename,img) return img 效果: 降噪 降噪是验证码处理中比较重要的一个步骤,我这里使用了点降噪和线降噪 线降噪的思路就是检测这个点相邻的四个点(图中标出的绿色点),判断这四个点中是白点的个数,如果有两个以上的白色像素点,那么就认为这个点是白色的,从而去除整个干扰线,但是这种方法是有限度的,如果干扰线特别粗就没有办法去除,只能去除细的干扰线 代码: 1 # 干扰线降噪 2 def interference_line(img, img_name): 3 filename = './out_img/' + img_name.split('.')[0] + '-interferenceline.jpg' 4 h, w = img.shape[:2] 5 # !!!opencv矩阵点是反的 6 # img[1,2] 1:图片的高度,2:图片的宽度 7 for y in range(1, w - 1): 8 for x in range(1, h - 1): 9 count = 0 10 if img[x, y - 1] > 245: 11 count = count + 1 12 if img[x, y + 1] > 245: 13 count = count + 1 14 if img[x - 1, y] > 245: 15 count = count + 1 16 if img[x + 1, y] > 245: 17 count = count + 1 18 if count > 2: 19 img[x, y] = 255 20 cv2.imwrite(filename,img) 21 return img 点降噪的思路和线降噪的差不多,只是会针对不同的位置检测的点不一样,注释写的很清楚了 代码: # 点降噪 def interference_point(img,img_name, x = 0, y = 0): """ 9邻域框,以当前点为中心的田字框,黑点个数 :param x: :param y: :return: """ filename = './out_img/' + img_name.split('.')[0] + '-interferencePoint.jpg' # todo 判断图片的长宽度下限 cur_pixel = img[x,y]# 当前像素点的值 height,width = img.shape[:2] for y in range(0, width - 1): for x in range(0, height - 1): if y == 0: # 第一行 if x == 0: # 左上顶点,4邻域 # 中心点旁边3个点 sum = int(cur_pixel) \ + int(img[x, y + 1]) \ + int(img[x + 1, y]) \ + int(img[x + 1, y + 1]) if sum <= 2 * 245: img[x, y] = 0 elif x == height - 1: # 右上顶点 sum = int(cur_pixel) \ + int(img[x, y + 1]) \ + int(img[x - 1, y]) \ + int(img[x - 1, y + 1]) if sum <= 2 * 245: img[x, y] = 0 else: # 最上非顶点,6邻域 sum = int(img[x - 1, y]) \ + int(img[x - 1, y + 1]) \ + int(cur_pixel) \ + int(img[x, y + 1]) \ + int(img[x + 1, y]) \ + int(img[x + 1, y + 1]) if sum <= 3 * 245: img[x, y] = 0 elif y == width - 1: # 最下面一行 if x == 0: # 左下顶点 # 中心点旁边3个点 sum = int(cur_pixel) \ + int(img[x + 1, y]) \ + int(img[x + 1, y - 1]) \ + int(img[x, y - 1]) if sum <= 2 * 245: img[x, y] = 0 elif x == height - 1: # 右下顶点 sum = int(cur_pixel) \ + int(img[x, y - 1]) \ + int(img[x - 1, y]) \ + int(img[x - 1, y - 1]) if sum <= 2 * 245: img[x, y] = 0 else: # 最下非顶点,6邻域 sum = int(cur_pixel) \ + int(img[x - 1, y]) \ + int(img[x + 1, y]) \ + int(img[x, y - 1]) \ + int(img[x - 1, y - 1]) \ + int(img[x + 1, y - 1]) if sum <= 3 * 245: img[x, y] = 0 else: # y不在边界 if x == 0: # 左边非顶点 sum = int(img[x, y - 1]) \ + int(cur_pixel) \ + int(img[x, y + 1]) \ + int(img[x + 1, y - 1]) \ + int(img[x + 1, y]) \ + int(img[x + 1, y + 1]) if sum <= 3 * 245: img[x, y] = 0 elif x == height - 1: # 右边非顶点 sum = int(img[x, y - 1]) \ + int(cur_pixel) \ + int(img[x, y + 1]) \ + int(img[x - 1, y - 1]) \ + int(img[x - 1, y]) \ + int(img[x - 1, y + 1]) if sum <= 3 * 245: img[x, y] = 0 else: # 具备9领域条件的 sum = int(img[x - 1, y - 1]) \ + int(img[x - 1, y]) \ + int(img[x - 1, y + 1]) \ + int(img[x, y - 1]) \ + int(cur_pixel) \ + int(img[x, y + 1]) \ + int(img[x + 1, y - 1]) \ + int(img[x + 1, y]) \ + int(img[x + 1, y + 1]) if sum <= 4 * 245: img[x, y] = 0 cv2.imwrite(filename,img) return img 效果: 其实到了这一步,这些字符就可以识别了,没必要进行字符切割了,现在这三种类型的验证码识别率已经达到50%以上了 字符切割 字符切割通常用于验证码中有粘连的字符,粘连的字符不好识别,所以我们需要将粘连的字符切割为单个的字符,在进行识别 字符切割的思路就是找到一个黑色的点,然后在遍历与他相邻的黑色的点,直到遍历完所有的连接起来的黑色的点,找出这些点中的最高的点、最低的点、最右边的点、最左边的点,记录下这四个点,认为这是一个字符,然后在向后遍历点,直至找到黑色的点,继续以上的步骤。最后通过每个字符的四个点进行切割 图中红色的点就是代码执行完后,标识出的每个字符的四个点,然后就会根据这四个点进行切割(图中画的有些误差,懂就好) 但是也可以看到,m2是粘连的,代码认为他是一个字符,所以我们需要对每个字符的宽度进行检测,如果他的宽度过宽,我们就认为他是两个粘连在一起的字符,并将它在从中间切割 确定每个字符的四个点代码: def cfs(im,x_fd,y_fd): '''用队列和集合记录遍历过的像素坐标代替单纯递归以解决cfs访问过深问题 ''' # print('**********') xaxis=[] yaxis=[] visited =set() q = Queue() q.put((x_fd, y_fd)) visited.add((x_fd, y_fd)) offsets=[(1, 0), (0, 1), (-1, 0), (0, -1)]#四邻域 while not q.empty(): x,y=q.get() for xoffset,yoffset in offsets: x_neighbor,y_neighbor = x+xoffset,y+yoffset if (x_neighbor,y_neighbor) in (visited): continue # 已经访问过了 visited.add((x_neighbor, y_neighbor)) try: if im[x_neighbor, y_neighbor] == 0: xaxis.append(x_neighbor) yaxis.append(y_neighbor) q.put((x_neighbor,y_neighbor)) except IndexError: pass # print(xaxis) if (len(xaxis) == 0 | len(yaxis) == 0): xmax = x_fd + 1 xmin = x_fd ymax = y_fd + 1 ymin = y_fd else: xmax = max(xaxis) xmin = min(xaxis) ymax = max(yaxis) ymin = min(yaxis) #ymin,ymax=sort(yaxis) return ymax,ymin,xmax,xmin def detectFgPix(im,xmax): '''搜索区块起点 ''' h,w = im.shape[:2] for y_fd in range(xmax+1,w): for x_fd in range(h): if im[x_fd,y_fd] == 0: return x_fd,y_fd def CFS(im): '''切割字符位置 ''' zoneL=[]#各区块长度L列表 zoneWB=[]#各区块的X轴[起始,终点]列表 zoneHB=[]#各区块的Y轴[起始,终点]列表 xmax=0#上一区块结束黑点横坐标,这里是初始化 for i in range(10): try: x_fd,y_fd = detectFgPix(im,xmax) # print(y_fd,x_fd) xmax,xmin,ymax,ymin=cfs(im,x_fd,y_fd) L = xmax - xmin H = ymax - ymin zoneL.append(L) zoneWB.append([xmin,xmax]) zoneHB.append([ymin,ymax]) except TypeError: return zoneL,zoneWB,zoneHB return zoneL,zoneWB,zoneHB 分割粘连字符代码: # 切割的位置 im_position = CFS(im) maxL = max(im_position[0]) minL = min(im_position[0]) # 如果有粘连字符,如果一个字符的长度过长就认为是粘连字符,并从中间进行切割 if(maxL > minL + minL * 0.7): maxL_index = im_position[0].index(maxL) minL_index = im_position[0].index(minL) # 设置字符的宽度 im_position[0][maxL_index] = maxL // 2 im_position[0].insert(maxL_index + 1, maxL // 2) # 设置字符X轴[起始,终点]位置 im_position[1][maxL_index][1] = im_position[1][maxL_index][0] + maxL // 2 im_position[1].insert(maxL_index + 1, [im_position[1][maxL_index][1] + 1, im_position[1][maxL_index][1] + 1 + maxL // 2]) # 设置字符的Y轴[起始,终点]位置 im_position[2].insert(maxL_index + 1, im_position[2][maxL_index]) # 切割字符,要想切得好就得配置参数,通常 1 or 2 就可以 cutting_img(im,im_position,img_name,1,1) 切割粘连字符代码: def cutting_img(im,im_position,img,xoffset = 1,yoffset = 1): filename = './out_img/' + img.split('.')[0] # 识别出的字符个数 im_number = len(im_position[1]) # 切割字符 for i in range(im_number): im_start_X = im_position[1][i][0] - xoffset im_end_X = im_position[1][i][1] + xoffset im_start_Y = im_position[2][i][0] - yoffset im_end_Y = im_position[2][i][1] + yoffset cropped = im[im_start_Y:im_end_Y, im_start_X:im_end_X] cv2.imwrite(filename + '-cutting-' + str(i) + '.jpg',cropped) 效果: 识别 识别用的是typesseract库,主要识别一行字符和单个字符时的参数设置,识别中英文的参数设置,代码很简单就一行,我这里大多是filter文件的操作 代码: # 识别验证码 cutting_img_num = 0 for file in os.listdir('./out_img'): str_img = '' if fnmatch(file, '%s-cutting-*.jpg' % img_name.split('.')[0]): cutting_img_num += 1 for i in range(cutting_img_num): try: file = './out_img/%s-cutting-%s.jpg' % (img_name.split('.')[0], i) # 识别字符 str_img = str_img + image_to_string(Image.open(file),lang = 'eng', config='-psm 10') #单个字符是10,一行文本是7 except Exception as err: pass print('切图:%s' % cutting_img_num) print('识别为:%s' % str_img) 最后这种粘连字符的识别率是在30%左右,而且这种只是处理两个字符粘连,如果有两个以上的字符粘连还不能识别,但是根据字符宽度判别的话也不难,有兴趣的可以试一下 无需切割字符识别的效果: 需要切割字符的识别效果: 1、将要识别的验证码图片放入与脚本同级的img文件夹中,创建out_img文件夹 2、python3 filename 3、二值化、降噪等各个阶段的图片将存储在out_img文件夹中,最终识别结果会打印到屏幕上 最后附上源码(带切割,不想要切割的就自己修改吧): 1 from PIL import Image 2 from pytesseract import * 3 from fnmatch import fnmatch 4 from queue import Queue 5 import matplotlib.pyplot as plt 6 import cv2 7 import time 8 import os 9 10 11 12 13 14 def clear_border(img,img_name): 15 '''去除边框 16 ''' 17 18 filename = './out_img/' + img_name.split('.')[0] + '-clearBorder.jpg' 19 h, w = img.shape[:2] 20 for y in range(0, w): 21 for x in range(0, h): 22 # if y ==0 or y == w -1 or y == w - 2: 23 if y < 4 or y > w -4: 24 img[x, y] = 255 25 # if x == 0 or x == h - 1 or x == h - 2: 26 if x < 4 or x > h - 4: 27 img[x, y] = 255 28 29 cv2.imwrite(filename,img) 30 return img 31 32 33 def interference_line(img, img_name): 34 ''' 35 干扰线降噪 36 ''' 37 38 filename = './out_img/' + img_name.split('.')[0] + '-interferenceline.jpg' 39 h, w = img.shape[:2] 40 # !!!opencv矩阵点是反的 41 # img[1,2] 1:图片的高度,2:图片的宽度 42 for y in range(1, w - 1): 43 for x in range(1, h - 1): 44 count = 0 45 if img[x, y - 1] > 245: 46 count = count + 1 47 if img[x, y + 1] > 245: 48 count = count + 1 49 if img[x - 1, y] > 245: 50 count = count + 1 51 if img[x + 1, y] > 245: 52 count = count + 1 53 if count > 2: 54 img[x, y] = 255 55 cv2.imwrite(filename,img) 56 return img 57 58 def interference_point(img,img_name, x = 0, y = 0): 59 """点降噪 60 9邻域框,以当前点为中心的田字框,黑点个数 61 :param x: 62 :param y: 63 :return: 64 """ 65 filename = './out_img/' + img_name.split('.')[0] + '-interferencePoint.jpg' 66 # todo 判断图片的长宽度下限 67 cur_pixel = img[x,y]# 当前像素点的值 68 height,width = img.shape[:2] 69 70 for y in range(0, width - 1): 71 for x in range(0, height - 1): 72 if y == 0: # 第一行 73 if x == 0: # 左上顶点,4邻域 74 # 中心点旁边3个点 75 sum = int(cur_pixel) \ 76 + int(img[x, y + 1]) \ 77 + int(img[x + 1, y]) \ 78 + int(img[x + 1, y + 1]) 79 if sum <= 2 * 245: 80 img[x, y] = 0 81 elif x == height - 1: # 右上顶点 82 sum = int(cur_pixel) \ 83 + int(img[x, y + 1]) \ 84 + int(img[x - 1, y]) \ 85 + int(img[x - 1, y + 1]) 86 if sum <= 2 * 245: 87 img[x, y] = 0 88 else: # 最上非顶点,6邻域 89 sum = int(img[x - 1, y]) \ 90 + int(img[x - 1, y + 1]) \ 91 + int(cur_pixel) \ 92 + int(img[x, y + 1]) \ 93 + int(img[x + 1, y]) \ 94 + int(img[x + 1, y + 1]) 95 if sum <= 3 * 245: 96 img[x, y] = 0 97 elif y == width - 1: # 最下面一行 98 if x == 0: # 左下顶点 99 # 中心点旁边3个点 100 sum = int(cur_pixel) \ 101 + int(img[x + 1, y]) \ 102 + int(img[x + 1, y - 1]) \ 103 + int(img[x, y - 1]) 104 if sum <= 2 * 245: 105 img[x, y] = 0 106 elif x == height - 1: # 右下顶点 107 sum = int(cur_pixel) \ 108 + int(img[x, y - 1]) \ 109 + int(img[x - 1, y]) \ 110 + int(img[x - 1, y - 1]) 111 112 if sum <= 2 * 245: 113 img[x, y] = 0 114 else: # 最下非顶点,6邻域 115 sum = int(cur_pixel) \ 116 + int(img[x - 1, y]) \ 117 + int(img[x + 1, y]) \ 118 + int(img[x, y - 1]) \ 119 + int(img[x - 1, y - 1]) \ 120 + int(img[x + 1, y - 1]) 121 if sum <= 3 * 245: 122 img[x, y] = 0 123 else: # y不在边界 124 if x == 0: # 左边非顶点 125 sum = int(img[x, y - 1]) \ 126 + int(cur_pixel) \ 127 + int(img[x, y + 1]) \ 128 + int(img[x + 1, y - 1]) \ 129 + int(img[x + 1, y]) \ 130 + int(img[x + 1, y + 1]) 131 132 if sum <= 3 * 245: 133 img[x, y] = 0 134 elif x == height - 1: # 右边非顶点 135 sum = int(img[x, y - 1]) \ 136 + int(cur_pixel) \ 137 + int(img[x, y + 1]) \ 138 + int(img[x - 1, y - 1]) \ 139 + int(img[x - 1, y]) \ 140 + int(img[x - 1, y + 1]) 141 142 if sum <= 3 * 245: 143 img[x, y] = 0 144 else: # 具备9领域条件的 145 sum = int(img[x - 1, y - 1]) \ 146 + int(img[x - 1, y]) \ 147 + int(img[x - 1, y + 1]) \ 148 + int(img[x, y - 1]) \ 149 + int(cur_pixel) \ 150 + int(img[x, y + 1]) \ 151 + int(img[x + 1, y - 1]) \ 152 + int(img[x + 1, y]) \ 153 + int(img[x + 1, y + 1]) 154 if sum <= 4 * 245: 155 img[x, y] = 0 156 cv2.imwrite(filename,img) 157 return img 158 159 def _get_dynamic_binary_image(filedir, img_name): 160 ''' 161 自适应阀值二值化 162 ''' 163 164 filename = './out_img/' + img_name.split('.')[0] + '-binary.jpg' 165 img_name = filedir + '/' + img_name 166 print('.....' + img_name) 167 im = cv2.imread(img_name) 168 im = cv2.cvtColor(im,cv2.COLOR_BGR2GRAY) 169 170 th1 = cv2.adaptiveThreshold(im, 255, cv2.ADAPTIVE_THRESH_GAUSSIAN_C, cv2.THRESH_BINARY, 21, 1) 171 cv2.imwrite(filename,th1) 172 return th1 173 174 def _get_static_binary_image(img, threshold = 140): 175 ''' 176 手动二值化 177 ''' 178 179 img = Image.open(img) 180 img = img.convert('L') 181 pixdata = img.load() 182 w, h = img.size 183 for y in range(h): 184 for x in range(w): 185 if pixdata[x, y] < threshold: 186 pixdata[x, y] = 0 187 else: 188 pixdata[x, y] = 255 189 190 return img 191 192 193 def cfs(im,x_fd,y_fd): 194 '''用队列和集合记录遍历过的像素坐标代替单纯递归以解决cfs访问过深问题 195 ''' 196 197 # print('**********') 198 199 xaxis=[] 200 yaxis=[] 201 visited =set() 202 q = Queue() 203 q.put((x_fd, y_fd)) 204 visited.add((x_fd, y_fd)) 205 offsets=[(1, 0), (0, 1), (-1, 0), (0, -1)]#四邻域 206 207 while not q.empty(): 208 x,y=q.get() 209 210 for xoffset,yoffset in offsets: 211 x_neighbor,y_neighbor = x+xoffset,y+yoffset 212 213 if (x_neighbor,y_neighbor) in (visited): 214 continue # 已经访问过了 215 216 visited.add((x_neighbor, y_neighbor)) 217 218 try: 219 if im[x_neighbor, y_neighbor] == 0: 220 xaxis.append(x_neighbor) 221 yaxis.append(y_neighbor) 222 q.put((x_neighbor,y_neighbor)) 223 224 except IndexError: 225 pass 226 # print(xaxis) 227 if (len(xaxis) == 0 | len(yaxis) == 0): 228 xmax = x_fd + 1 229 xmin = x_fd 230 ymax = y_fd + 1 231 ymin = y_fd 232 233 else: 234 xmax = max(xaxis) 235 xmin = min(xaxis) 236 ymax = max(yaxis) 237 ymin = min(yaxis) 238 #ymin,ymax=sort(yaxis) 239 240 return ymax,ymin,xmax,xmin 241 242 def detectFgPix(im,xmax): 243 '''搜索区块起点 244 ''' 245 246 h,w = im.shape[:2] 247 for y_fd in range(xmax+1,w): 248 for x_fd in range(h): 249 if im[x_fd,y_fd] == 0: 250 return x_fd,y_fd 251 252 def CFS(im): 253 '''切割字符位置 254 ''' 255 256 zoneL=[]#各区块长度L列表 257 zoneWB=[]#各区块的X轴[起始,终点]列表 258 zoneHB=[]#各区块的Y轴[起始,终点]列表 259 260 xmax=0#上一区块结束黑点横坐标,这里是初始化 261 for i in range(10): 262 263 try: 264 x_fd,y_fd = detectFgPix(im,xmax) 265 # print(y_fd,x_fd) 266 xmax,xmin,ymax,ymin=cfs(im,x_fd,y_fd) 267 L = xmax - xmin 268 H = ymax - ymin 269 zoneL.append(L) 270 zoneWB.append([xmin,xmax]) 271 zoneHB.append([ymin,ymax]) 272 273 except TypeError: 274 return zoneL,zoneWB,zoneHB 275 276 return zoneL,zoneWB,zoneHB 277 278 279 def cutting_img(im,im_position,img,xoffset = 1,yoffset = 1): 280 filename = './out_img/' + img.split('.')[0] 281 # 识别出的字符个数 282 im_number = len(im_position[1]) 283 # 切割字符 284 for i in range(im_number): 285 im_start_X = im_position[1][i][0] - xoffset 286 im_end_X = im_position[1][i][1] + xoffset 287 im_start_Y = im_position[2][i][0] - yoffset 288 im_end_Y = im_position[2][i][1] + yoffset 289 cropped = im[im_start_Y:im_end_Y, im_start_X:im_end_X] 290 cv2.imwrite(filename + '-cutting-' + str(i) + '.jpg',cropped) 291 292 293 294 def main(): 295 filedir = './easy_img' 296 297 for file in os.listdir(filedir): 298 if fnmatch(file, '*.jpeg'): 299 img_name = file 300 301 # 自适应阈值二值化 302 im = _get_dynamic_binary_image(filedir, img_name) 303 304 # 去除边框 305 im = clear_border(im,img_name) 306 307 # 对图片进行干扰线降噪 308 im = interference_line(im,img_name) 309 310 # 对图片进行点降噪 311 im = interference_point(im,img_name) 312 313 # 切割的位置 314 im_position = CFS(im) 315 316 maxL = max(im_position[0]) 317 minL = min(im_position[0]) 318 319 # 如果有粘连字符,如果一个字符的长度过长就认为是粘连字符,并从中间进行切割 320 if(maxL > minL + minL * 0.7): 321 maxL_index = im_position[0].index(maxL) 322 minL_index = im_position[0].index(minL) 323 # 设置字符的宽度 324 im_position[0][maxL_index] = maxL // 2 325 im_position[0].insert(maxL_index + 1, maxL // 2) 326 # 设置字符X轴[起始,终点]位置 327 im_position[1][maxL_index][1] = im_position[1][maxL_index][0] + maxL // 2 328 im_position[1].insert(maxL_index + 1, [im_position[1][maxL_index][1] + 1, im_position[1][maxL_index][1] + 1 + maxL // 2]) 329 # 设置字符的Y轴[起始,终点]位置 330 im_position[2].insert(maxL_index + 1, im_position[2][maxL_index]) 331 332 # 切割字符,要想切得好就得配置参数,通常 1 or 2 就可以 333 cutting_img(im,im_position,img_name,1,1) 334 335 # 识别验证码 336 cutting_img_num = 0 337 for file in os.listdir('./out_img'): 338 str_img = '' 339 if fnmatch(file, '%s-cutting-*.jpg' % img_name.split('.')[0]): 340 cutting_img_num += 1 341 for i in range(cutting_img_num): 342 try: 343 file = './out_img/%s-cutting-%s.jpg' % (img_name.split('.')[0], i) 344 # 识别验证码 345 str_img = str_img + image_to_string(Image.open(file),lang = 'eng', config='-psm 10') #单个字符是10,一行文本是7 346 except Exception as err: 347 pass 348 print('切图:%s' % cutting_img_num) 349 print('识别为:%s' % str_img) 350 351 if __name__ == '__main__': 352 main() View Code
查看详情